In my younger days, I had a summer job at a heating/air-conditioning/plumbing/electric/lumberyard/hardware store [link to their Facebook page] and learned a lot of trades (I think my forklift operator's license is still valid, come to think of it). One physical thing I came away with was the frame for this clock, which the owners let me have since it was an OLD light advertisement for GE Light Bulbs that they had picked up at an estate sale many years prior.
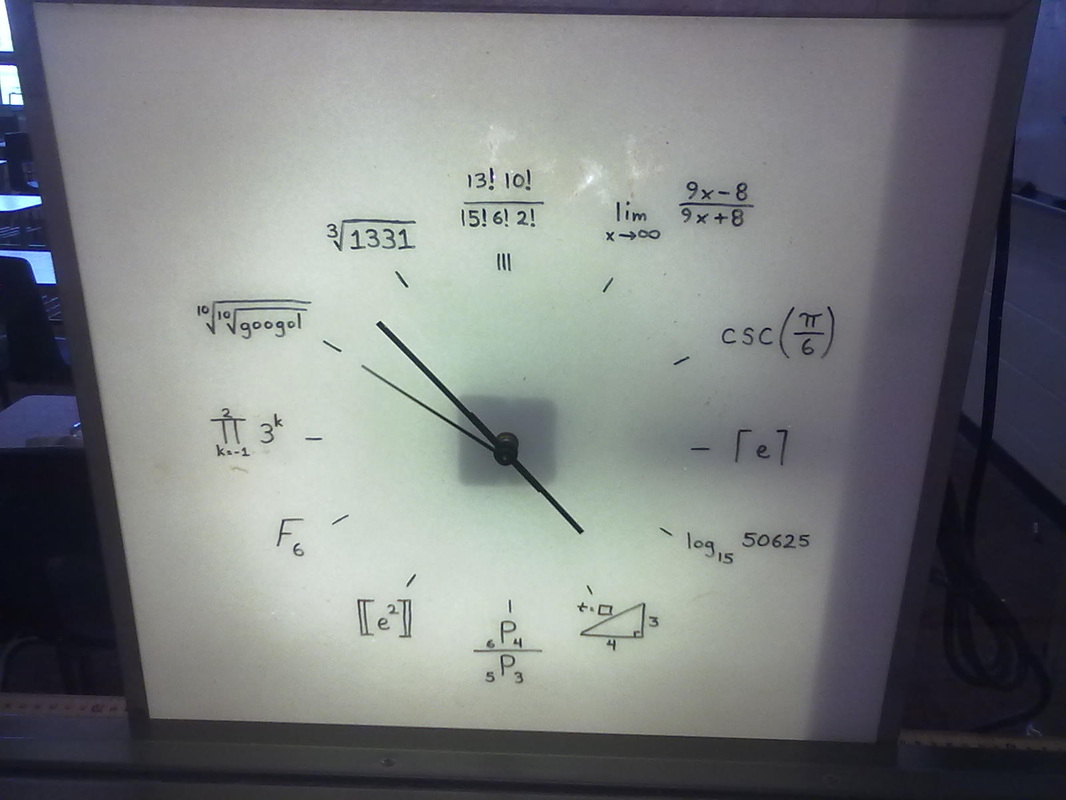
Years later, I scored a summer job with a sign company (using my forklift operating prowess to become a crane operator) and learned a few tricks of that trade that helped in creating numerous displays and handouts for my classes. I used a plexiglass surface to allow expressions to be changed, depending on the unit your class is covering.
Here's the shopping list of things I used for this project:
That's it! Inexpensive, super fun to put together. It is amazing the amount of foot traffic that finds its way past my classroom now so students can explain to one another why a particular expression is in place of a certain hour. Call it reverse engineering, of sorts, since they already know the answer but need to figure out how we get there.
I hope you enjoy this project as much as I did. Let me know in the comments.
--Keltner--
Years later, I scored a summer job with a sign company (using my forklift operating prowess to become a crane operator) and learned a few tricks of that trade that helped in creating numerous displays and handouts for my classes. I used a plexiglass surface to allow expressions to be changed, depending on the unit your class is covering.
Here's the shopping list of things I used for this project:
- [Existing] Fluorescent light cabinet (similar fixtures are available at Home Depot for a little help) with a dry erase marker-friendly surface--fluorescent light because it has a cooler effect, in a temperature aspect and visual aspect
- [In lieu of fluorescent light fixture] Hard surface, still dry erase marker-friendly--I would suggest something at least 1 ft. by 1 ft. to make it visible from further away than just a couple of feet, but not big enough to distract passersby on a nearby street. The melamine dry erase boards that other #Made4Math people have talked about constructing would seem to work fine, but would be nonrefundable since this project requires a hole to be drilled in its center.
- Clock kit with battery power source (available on Amazon for less than $10, usually)--at hobby stores, different clock hand designs are available that look less decorative and in alternate colors. I suggested a clock kit with battery power so that unplugging the light does not disable the timekeeping component of the figure.
- A protractor to help manually mark out the hour markings on the clock face, allowing enough room outside to scribe the expression you want to represent that particular hour.
That's it! Inexpensive, super fun to put together. It is amazing the amount of foot traffic that finds its way past my classroom now so students can explain to one another why a particular expression is in place of a certain hour. Call it reverse engineering, of sorts, since they already know the answer but need to figure out how we get there.
I hope you enjoy this project as much as I did. Let me know in the comments.
--Keltner--
 RSS Feed